Admin Initial Process
Install and set up Base Unit
Install Client App on Admin Computer
Create other User Accounts
Step 1
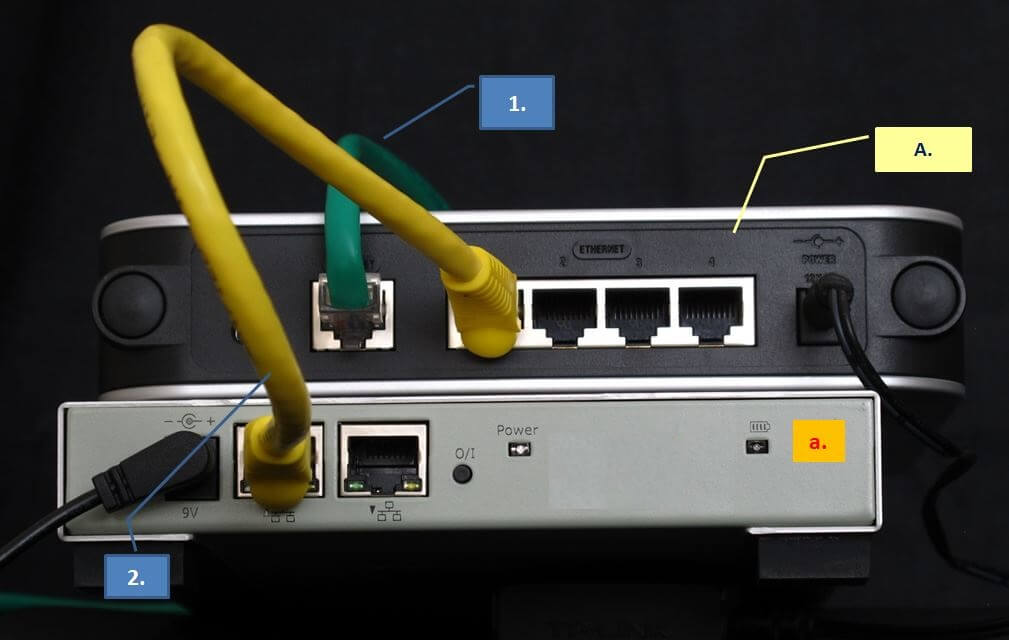
Connect new Un-configured Unit’s Up-link Ethernet connector to your router’s LAN port. (Yellow cable in picture)
Your router must have Internet access and connection. (Green cable in picture)
SMARTOffice units communicate with your computers via your router’s LAN network.
Step 2
Make sure other devices in your company network do not use the following internal IP addresses.
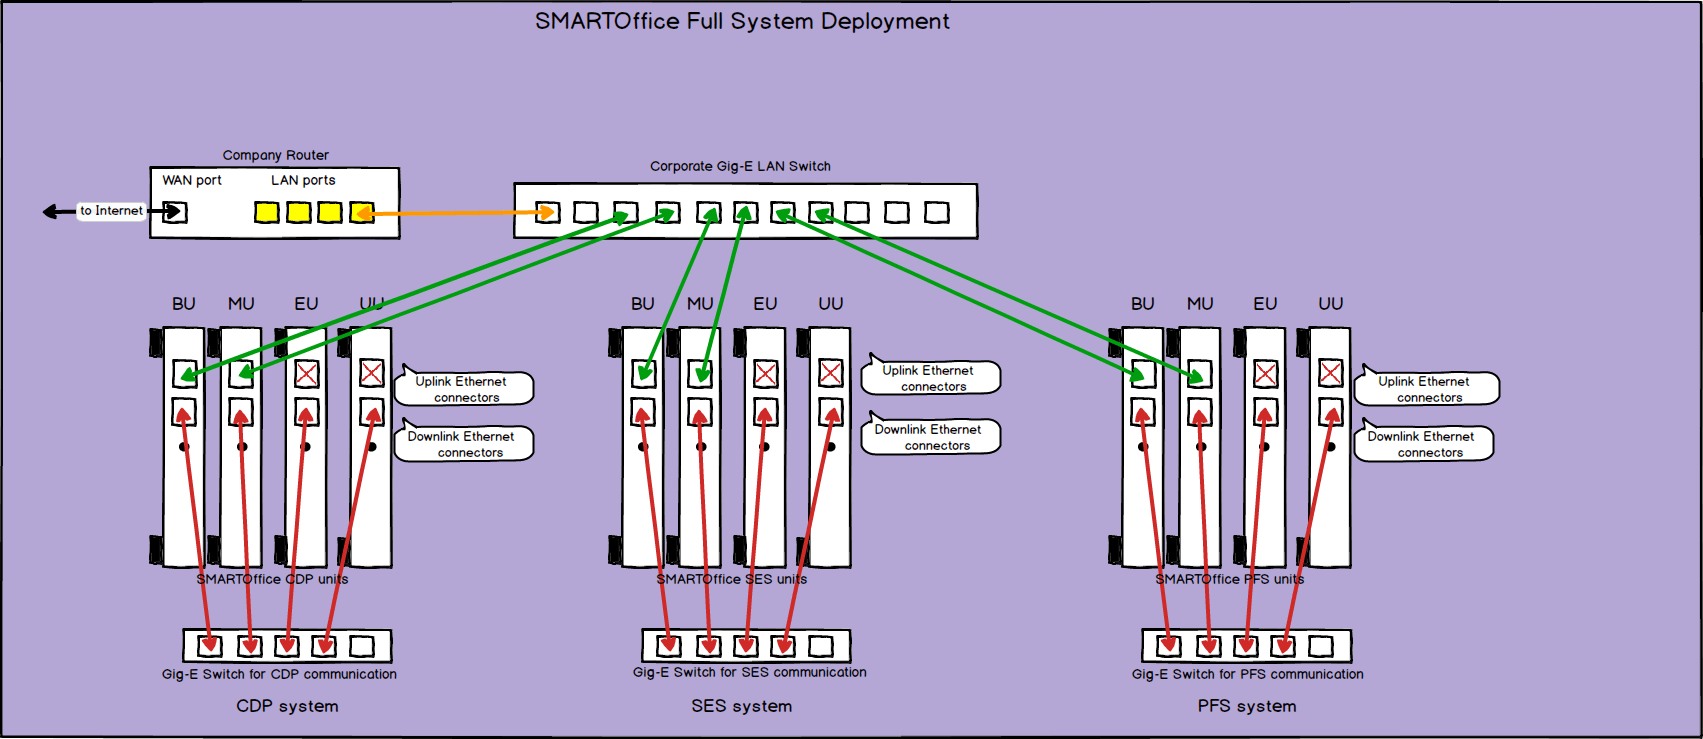
CDP product uses fixed internal IP address 192.168.1.97
PFS product uses fixed internal IP address 192.168.1.98
SES product uses fixed internal IP address 192.168.1.99
Step 3
Keep the Down-link Ethernet connector (closest to the I/O power button) un-connected. It will be used when you expand your SMARTOffice system.
Step 4
Download the OS specific Unified Installer from here onto admin’s computer and run it.
Step 5
During this process, you will be asked to enter 3 phrases (and 3 hints) that can be used to login the machine if you forgot the admin password. This is only for loss of admin password, as admin can reset password for other users, but only this method can rescue the admin without a password.
Step 6
You will be asked the following questions:
Which device you are installing: PFS – CDP – SES. If you are installing more than 1 product, you will need to run the installer multiple times, once for each product.
Configure or Associate – Select Configure for the initial setup.
Local or Remote – Select Local since machine is on your local network. Installer will scan local network for an Un-configured Unit UU of the corresponding product type.
Step 7
When a product is found, click on the unit with the desired SN. The Installer will configure the UU to become BU and will download the Client app from the product and install it on admin’s computer.
Step 8
After Client app is installed, admin shall log in (default password Admin12##34)
You are advised to change this password but make sure it is remembered.
Step 9
You also should change the Organization name to something unique for your organization. If not, machine takes a default Organization name.
Step 10
Create more user accounts using Wizard so that users can subsequently associate to the machine. Create each user account with a unique login name and password. Provide these to each user. Users can be in company network or outside company network such as on the Internet. Users connecting to Base Unit from the Internet also need the Base Unit’s SN to complete the Association. You can find BU’s SN in Client app’s System Map page.
Other Users Installation Process
Other Users Associate their Computers to BU
Install Client App on their Computer
Step 1
Download the OS specific Unified Installer from here onto your computer and run it.
Step 2
You will be asked the following questions:
Which product you are installing: PFS – CDP – SES. If you are associating to more than 1 product, you will need to run the installer multiple times; once for each product.
Configure or Associate – Select Associate and enter the SN provided by your system Admin or manager if you are asked.
Installer will locate the specified machine.
Step 3
When product is found, the Installer will download the Client app from the product, install it on your computer and launch it.
Step 4
Log in with the user name and password information given to you by your Admin or manager.
You are advised to change this password but make sure it is remembered. If you forget the password in the future, you will need to contact your Admin or manager to reset password for you.
SMARTOffice Full System Deployment
To the Admin: if you plan to install more than one SMARTOffice product (CDP, PFS, SES) or to include SMARTOffice redundant server (MU) or capacity expansion (EU) feature in the same office network, familiarize the diagram below on how products are connected.